
Can you fix hardwood floor scratches from dogs? Yes, you can! From minor scuffs to deeper gouges, there are several ways to repair hardwood floors damaged by your furry friends. This guide will walk you through fixing pet scratches on wood floor and how to tackle dog claw marks hardwood.
Our dogs are family, but their happy paws can sometimes leave a not-so-happy mark on our beautiful hardwood floors. Those telltale dog claw marks hardwood can be a homeowner’s nightmare, especially if you have a particularly energetic pup or a pack of them. The good news is that you don’t have to live with unsightly scratches or immediately call for expensive professional refinishing hardwood floor dog damage. There are many effective methods for repair wood floor dog scratches, ranging from simple DIY fixes for light marks to more involved repairs for deeper damage. This comprehensive guide will cover everything you need to know about removing dog scratches from hardwood, making your floors look as good as new.
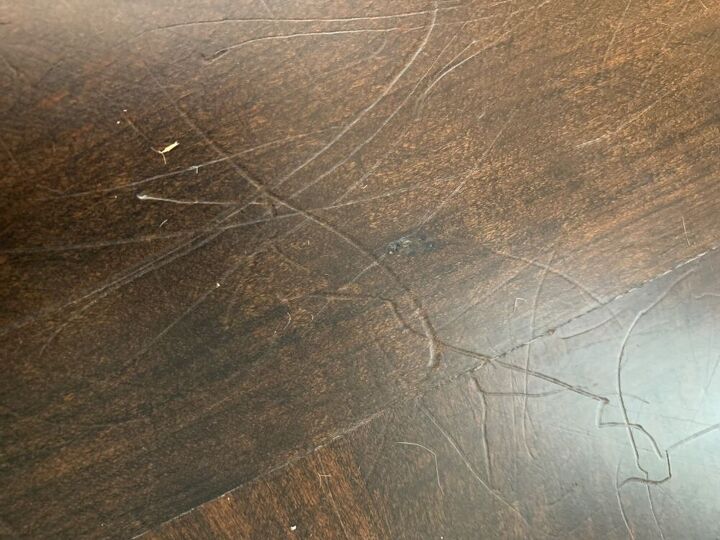
Image Source: cdn-fastly.hometalk.com
Assessing the Damage: What Kind of Scratches Are We Dealing With?
Before you grab any tools or products, it’s crucial to assess the type and depth of the scratches. This will determine the best approach for repair wood floor dog scratches.
Superficial Scratches
These are the most common type of pet scratches on wood floor. They only affect the top layer of the finish (the polyurethane or topcoat) and not the wood itself. They often look like light scuffs or hazy lines.
- Appearance: Light, silvery, or white lines on the surface.
- Feel: You usually can’t feel these with your fingernail.
- Cause: Light paw traffic, dragging objects, or initial contact with a claw.
Moderate Scratches
These scratches penetrate deeper into the finish and might slightly indent the wood. They are more noticeable and can sometimes feel like a slight groove when you run your finger over them.
- Appearance: More defined lines, sometimes with a slight discoloration.
- Feel: You might feel a slight edge or indent with your fingernail.
- Cause: More vigorous scratching from paws, or a nail catching the floor.
Deep Scratches and Gouges
These are the most severe. They go through the finish and into the actual wood, potentially causing a visible indentation or even splintering. These require more extensive repair.
- Appearance: Darker lines, visible wood damage, or splintered areas.
- Feel: You can easily feel a deep groove or nick with your fingernail.
- Cause: Prolonged or forceful scratching, or a sharp object (like a nail) digging into the floor.
DIY Solutions for Light Scratches
For those frustrating pet scratches on wood floor that only affect the finish, several DIY methods can bring back that shine. These are great for quick fixes and minor cosmetic issues.
The Power of Walnut
A simple, natural solution for minor scratches! The oils in walnuts can help blend and fill in light scratches.
- How it works: The natural oils in the nut help to darken and camouflage the scratch, while the slight abrasion from the nut shell can buff out superficial scuffs.
- Steps:
- Select a walnut (shelled is easiest).
- Gently rub the walnut over the scratch in the direction of the wood grain.
- Let the oil sit for a few minutes.
- Buff the area with a soft cloth.
- Wipe away any excess oil.
- Best for: Very light, superficial scratches that haven’t penetrated the finish.
Baking Soda Paste for Buffing
Baking soda is a mild abrasive that can help buff out light scratches on the finish.
- How it works: It gently polishes the surface without being too harsh.
- Steps:
- Mix baking soda with a little water to create a paste.
- Apply a small amount of the paste to a soft cloth.
- Gently rub the paste onto the scratch, following the wood grain.
- Wipe clean with a damp cloth and then dry thoroughly.
- Best for: Very minor scuffs and superficial marks. Be gentle to avoid creating more scratches.
Touch-Up Markers and Crayons
These are readily available at hardware stores and come in various wood tones. They are excellent for disguising dog claw marks hardwood by coloring the exposed wood.
- How it works: These products are designed to fill in and color the scratch, making it less visible.
- Steps:
- Clean the scratched area thoroughly.
- Choose a marker or crayon that closely matches your floor’s color. It’s often better to go slightly lighter, as you can always go darker.
- Apply the marker or crayon directly into the scratch, following the wood grain.
- Wipe away any excess color with a soft cloth.
- For crayons, you might need to gently buff the area to blend.
- Best for: Small, shallow scratches where the color of the wood is visible.
Furniture Polish or Oil-Based Restorers
Some wood furniture polishes contain oils and conditioning agents that can revive the finish and camouflage minor scratches.
- How it works: They add a layer of shine and can help blend the edges of light scratches.
- Steps:
- Clean the floor surface.
- Apply a small amount of the polish to a soft cloth.
- Rub the polish onto the scratched area, moving with the grain.
- Buff to a shine.
- Best for: Very light surface scuffs and to add a bit of luster to dull areas.
Intermediate Repairs: Filling and Blending
When scratches are a bit deeper, you’ll need something more substantial than a touch-up marker. These methods involve filling dog scratches wood floor to restore the surface.
Wood Filler and Putty
For deeper scratches and minor gouges, wood filler or putty is an effective solution. These come in various colors or can be stained to match your floor.
- How it works: These products fill the void created by the scratch, providing a smooth surface.
- Steps:
- Clean the scratch thoroughly, removing any debris.
- Select a wood filler that matches your floor color or a stainable option.
- Apply a small amount of filler into the scratch using a putty knife. Overfill slightly, as it may shrink as it dries.
- Smooth the filler flush with the floor surface.
- Allow the filler to dry completely according to the product’s instructions.
- Once dry, gently sand the filled area smooth with fine-grit sandpaper (e.g., 220-grit). Sand in the direction of the wood grain.
- Wipe away any dust.
- Apply a matching finish (polyurethane, varnish) to seal the repaired area and protect it. This might involve carefully brushing on a thin layer.
- Best for: Deeper scratches and small nicks where the wood is visibly indented.
Using a Hardwood Floor Scratch Repair Kit
Many specialized hardwood floor scratch repair kit options are available commercially. These kits often contain a combination of fillers, touch-up pens, stain sticks, and applicators designed specifically for hardwood floors.
- How it works: These kits provide a comprehensive solution for various levels of pet scratches on wood floor, often allowing you to build up color and fill depth gradually.
- Steps: (Follow the specific kit instructions, but generally):
- Clean the area thoroughly.
- Use the included color-matching tools or pens to fill in the scratch.
- Apply wood putty or filler for deeper marks, allowing it to dry.
- Sand lightly if necessary to smooth the repair.
- Apply the kit’s sealing or finishing product to protect the repair.
- Best for: A range of scratches, offering a more tailored solution than individual products.
Toothpaste for Buffing (Use with Caution!)
While sometimes recommended, toothpaste can be abrasive. Use it only on the finish with extreme care.
- How it works: The mild abrasive in toothpaste can help buff out very fine scratches in the finish.
- Steps:
- Use a non-gel, white toothpaste.
- Apply a small dab to a soft cloth.
- Gently rub the scratch in a circular motion.
- Wipe clean with a damp cloth and dry.
- Best for: Extremely superficial scuffs on the finish only. Caution: Over-rubbing can damage the finish.
Advanced Solutions: Sanding and Refinishing
For widespread damage or deep, significant gouges that affect multiple areas of your floor, a more involved approach might be necessary. This is where refinishing hardwood floor dog damage comes into play.
Screen-and-Coat (Screening)
This is a less aggressive form of refinishing that removes the top layer of the existing finish and applies a new coat. It’s ideal for floors with many minor scratches and wear but without deep gouges into the wood itself.
- How it works: A specialized machine with a sanding screen removes the worn-out topcoat, and then a new protective finish is applied.
- Process:
- Preparation: Clear the room completely. Sweep and vacuum the floor thoroughly.
- Screening: Use a floor buffer with a sanding screen (typically 80-100 grit). Move the buffer across the floor, overlapping passes, to uniformly scuff the existing finish. This process removes the top layer of polyurethane but does not sand down to bare wood.
- Cleaning: Vacuum all dust thoroughly, then tack cloth the floor to remove any remaining fine particles.
- Applying Finish: Apply one or more coats of polyurethane (oil-based or water-based) using a high-quality applicator. Allow adequate drying time between coats as per product instructions.
- Best for: Floors with widespread surface scratches and dullness, but no deep gouges into the wood.
Full Sanding and Refinishing
This is the most thorough method for refinishing hardwood floor dog damage. It involves sanding the entire floor down to the bare wood, then restaining (optional) and applying multiple coats of new finish.
- How it works: This process removes all existing finishes, scratches, dents, and stains, allowing you to create a completely new surface.
- Process:
- Preparation: Empty the room. Protect adjacent areas from dust.
- Rough Sanding: Use a drum sander or orbital sander with coarse-grit sandpaper (e.g., 36-60 grit) to remove the old finish and any significant imperfections. Work in alternating directions and then with the grain.
- Edging and Detail Sanding: Use an edge sander for the areas the drum sander can’t reach and an orbital or corner sander for precise work.
- Intermediate Sanding: Use a medium-grit sandpaper (e.g., 80-100 grit) to smooth out any marks from the coarser grits.
- Final Sanding: Use fine-grit sandpaper (e.g., 120-150 grit) to create a perfectly smooth surface.
- Cleaning: Thoroughly vacuum all dust, followed by a tack cloth.
- Staining (Optional): If you wish to change the color, apply wood stain according to product instructions. Allow it to dry completely.
- Applying Finish: Apply several coats of polyurethane (or your chosen finish), allowing proper drying time between each coat. Lightly abrade with very fine grit sandpaper (220-320) or a polishing screen between coats for a smoother result.
- Best for: Floors with deep scratches, gouges, significant wear, or when you want to change the floor’s appearance entirely. This is the ultimate solution for severe dog claw marks hardwood.
Tools and Materials for Repair
Having the right supplies is key to successfully tackling dog scratches on hardwood.
Essential Tools and Materials:
-
For Light Scratches:
- Soft cloths (microfiber, cotton)
- Walnuts
- Baking soda
- White, non-gel toothpaste
- Wood touch-up markers or crayons
- Furniture polish or wood conditioner
-
For Moderate Scratches:
- Wood filler or putty (matching or stainable)
- Putty knife
- Fine-grit sandpaper (150-220 grit)
- Sanding block
- Applicator brushes or small rollers
- Matching wood finish (polyurethane, varnish, lacquer)
- Hardwood floor scratch repair kit
-
For Deep Scratches/Refinishing:
- Floor buffer with sanding screens and various grit sandpaper discs (36, 80, 120, 150, 220)
- Edge sander
- Orbital or corner sander
- Heavy-duty vacuum cleaner with hose attachment
- Tack cloths
- Wood stain (if changing color)
- Multiple coats of your chosen wood finish
- Paint trays and high-quality applicator pads or brushes
Tips for Preventing Dog Scratches
The best way to deal with pet scratches on wood floor is to prevent them in the first place! Being proactive can save you a lot of repair work and keep your floors looking pristine. Here’s how to make your hardwood floors more dog proof hardwood floor:
Keep Those Nails Trimmed!
This is arguably the MOST important step in preventing dog scratches on wood. Regularly trimming your dog’s nails is crucial.
- Frequency: Aim for every 2-4 weeks, depending on how quickly your dog’s nails grow.
- Technique: Trim just the tip of the nail, avoiding the quick (the pink part inside the nail that contains blood vessels and nerves). If you’re unsure, ask your vet or a groomer to show you how.
- Tools: Use sharp, high-quality dog nail clippers. Dull clippers can crush the nail, causing pain.
Consider Nail Caps or Paw Protection
For extra protection, especially with breeds prone to scratching or during the puppy phase, consider nail caps or paw protectors.
- Nail Caps: These are small vinyl caps that are glued onto your dog’s trimmed nails. They are safe and painless.
- Paw Balms/Waxes: Some products claim to harden nails and provide a protective layer. While they might offer some minimal benefit, regular trimming is still key.
- Dog Booties: For specific occasions or if your dog has particularly sharp nails, booties can offer temporary protection. Ensure they fit well and don’t cause discomfort.
Rugs and Runners
Strategically placed rugs and runners can provide a buffer zone in high-traffic areas where your dog frequently walks.
- Placement: Put them in hallways, near doorways, and in common resting spots.
- Material: Choose durable, non-slip rugs. Ensure they don’t have loops that can snag claws.
Training and Behavior Modification
Teach your dog good habits around your floors.
- Discourage Scratching: If you notice your dog habitually scratching at the floor, redirect them with a toy or a command.
- “Off” Command: Train your dog to get off the floor or furniture when asked, especially if they tend to dig or scratch.
- Provide Alternatives: Ensure your dog has plenty of appropriate chew toys and scratching posts (if applicable to your pet type) to redirect their natural behaviors.
Protective Coatings and Finishes
When installing new hardwood floors or during a refinishing project, consider a more durable finish.
- Polyurethane: High-solids polyurethane finishes are generally more durable than lower-solids versions.
- Aluminum Oxide Finishes: Many modern hardwood floors have a factory-applied finish containing aluminum oxide, which is extremely hard and scratch-resistant. If your current floors are older, consider refinishing hardwood floor dog damage with this type of coating.
- Matte Finishes: While not inherently more scratch-resistant, matte finishes tend to show scratches less obviously than high-gloss finishes.
When to Call a Professional
While many dog scratches on hardwood can be addressed with DIY methods, there are times when professional help is the best course of action.
- Widespread Deep Damage: If your entire floor is covered in deep scratches, gouges, or has splintered areas, a full sanding and refinishing by a professional is likely the most effective solution.
- Water Damage or Staining: If scratches have reached the bare wood and are discolored or if there’s water damage, professionals have the tools and expertise to address these issues properly.
- Lack of Confidence or Time: If you’re not comfortable with sanding equipment or don’t have the time for the extensive process of refinishing, hiring a professional hardwood floor contractor is wise. They can efficiently and effectively repair wood floor dog scratches.
- Complex Wood Types: Certain wood species or engineered hardwood floors might require specialized techniques that professionals are trained to handle.
Frequently Asked Questions (FAQ)
Q: Can I use furniture polish to fix dog scratches on my hardwood floors?
A: For very light scuffs on the finish, a good quality furniture polish or wood conditioner might help temporarily mask them by adding shine and filling minor imperfections. However, it will not fix deeper scratches that have penetrated the wood.
Q: Will filling dog scratches wood floor permanently fix them?
A: Filling scratches with wood filler or putty can provide a durable, long-lasting repair for deeper marks. The key is to use a quality product, apply it correctly, and seal it with a matching finish to protect the repair and blend it seamlessly with the surrounding floor.
Q: How do I know if my dog’s scratches need professional refinishing?
A: If the scratches are deep enough to feel a significant groove with your fingernail, if the wood is visibly indented or splintered, or if there are many scratches spread across a large area, professional refinishing hardwood floor dog damage is often the best solution. A professional can assess the damage and determine the most effective repair method.
Q: What is the best way to prevent dog scratches on hardwood floors?
A: The most effective way to prevent dog scratches on hardwood is regular nail trimming for your dog. Additionally, using rugs in high-traffic areas, providing your dog with appropriate chew toys to redirect their energy, and considering protective nail caps can all contribute to keeping your floors scratch-free. Making your floors dog proof hardwood floor is an ongoing effort.
Q: Can I use wood stain to fix a scratch?
A: Wood stain is used to color the wood. If a scratch has removed the original stain or finish and exposed lighter wood, you might be able to apply a matching stain to the exposed wood before sealing it. However, for deeper scratches, you’ll likely need wood filler or putty first to level the surface before staining and finishing.
Q: My dog has left deep gouges in my hardwood floor. What’s the best approach?
A: Deep gouges usually require more than a simple touch-up. You’ll likely need to clean the gouge, then use wood filler or putty to fill the void. Once dry and sanded smooth, you’ll need to apply a matching finish to the repaired area. If the damage is extensive, consider a hardwood floor scratch repair kit or professional refinishing.
Q: Is it better to repair scratches as they happen or wait for a full refinish?
A: For minor, superficial scratches, it’s often best to address them as they occur to prevent them from becoming more noticeable or collecting dirt. However, if you have numerous scratches, significant wear, or deep gouges, waiting for a full sanding and refinishing might be more cost-effective and provide a better overall result than attempting many individual repairs.
By understanding the types of scratches your dog may cause and utilizing the appropriate repair methods, you can keep your hardwood floors beautiful and dog proof hardwood floor for years to come. Remember that regular maintenance, especially nail care for your canine companion, is your first and best line of defense against pet scratches on wood floor.